Box Profile 34/1000 Installation Guide
Installation Guide and FAQs

BEFORE YOU GET STARTED & FOR YOUR Safety


BEFORE YOU GET STARTED
Working out the Sheets, Flashings, Fixings and Fillers that are needed for a project can be difficult. If you let us know the details of your roof we can help you figure out what you need and ensure that you place your order correctly. Remember that Sheets and Flashings are often manufactured to order and it could be one to two weeks before you receive your order. Make sure your plans allow for a suitable lead time prior to delivery.
UK law requires employers and self-employed contractors to formally assess the risks associated with each roofing job and, before starting their work, to plan and organise their work so that it is carried out in a safe manner. Further information on working at heights and other applicable legislative requirements can be found by visiting the Health and Safety Executive’s website www.hse.gov.uk. Receipt of goods, such as Sheets and Flashings, are bundled together and shipped in packs that are heavy and awkward to handle, making delivery worth the extra expense.
Upon receipt of your order, check that your goods are correct and consistent with the accompanying delivery note. Any issues should be reported to us immediately by phoning our Customer Service Team on 01837 659901. Two people may be able to lift a single Sheet at a time off a delivery truck, depending on their own physical ability and weather conditions. This will also depend on the length and weight of the Sheets, which are given on our website. Extra care should be taken in windy or exposed areas. The edges of Sheets and Flashings can be sharp so remember to wear protective gloves with rubber palms for grip.


For Your Safety
Roofing work can be hazardous. Caution should be exercised and appropriate safety precautions taken including the wearing of suitable protective gloves, clothing, footwear and hard hat.
Care should be taken when handling Sheets to prevent damage or injury during installation. If possible, mechanical handling equipment should be used. Dragging a Sheet's edge across another when unloading may cause scratching of the Sheet, so make sure the Sheet is lifted clear and not dragged. Any packaging should be removed before lifting Sheets onto a roof.
Installation

1
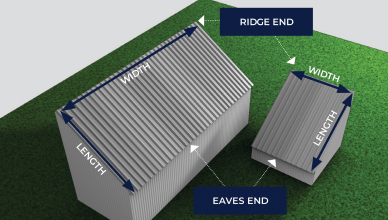
A single slope roof is sometimes referred to as a mono pitch or lean-to roof. When working out your Sheeting requirements, we require the length and width as shown in the diagram for us to be able to help you with a quotation. A width measurement is used to calculate the number of Sheets required. The length measurement is used to calculate the length of Sheets required.

2
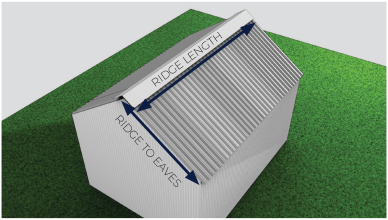
Apex roofs are separated by a central ridge. As per the diagram, we require the length of Sheet from ridge to eaves and the ridge length to calculate your requirements. You will need to measure both sides of the roof as the building/roof can vary in size from side to side. If the apex is uneven, ridge to eaves will need to be measured on both sides.
TOP TIP
When measuring your roof always measure in more than one place to ensure your roof is square. If you find you have different measurements, always order your sheets to the longest length.

3
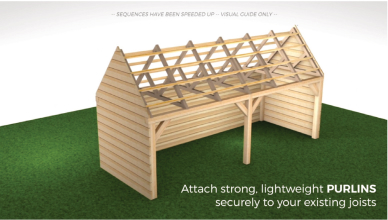
The minimum pitch needed for Box Profile Sheets is four degrees. If in doubt consult an engineer. The purlin spaces on average should be a maximum of 1.2m apart, however if using 0.5mm thick Sheets for the roof (which is normally used for side cladding) you would need to reduce purlin spaces to no more than 1m apart. Please note, these are recommended spacings and always seek advice from a structural engineer before installing.

4
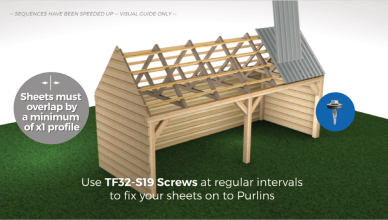
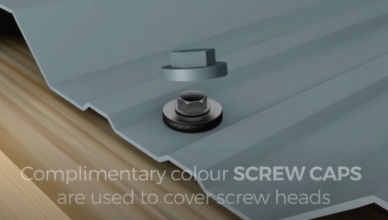
When installing Box Profile Sheets you may need to lay the Sheets on the roof before fixing to ensure the overlap is sufficient. Sheets should be overlapped by a minimum of one profile when laid side by side. Colour Caps can be used to cover the silver screw head and matched to the Roofing Sheet colour.

5
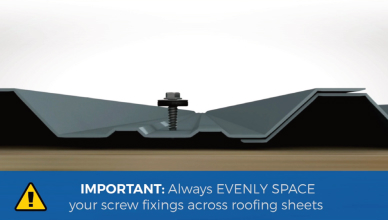
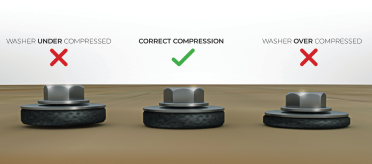
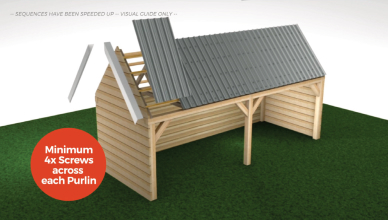
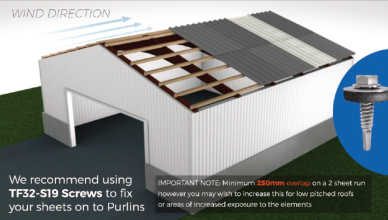
When fixing your Box Profile Sheets, it’s imperative they are fixed at the valley point. We recommend using our TF32-S19 Screws which are self-drilling and self-sealing. Please see image above.
TOP TIP
Do not over-tighten or under-tighten your screws as this can affect the performance of the washer and prevent it from sealing correctly.

6
Colour Caps can be used to match or contrast with the colour of the Sheeting you are using. They provide an effective way of concealing the steel Screws and washers from view.

7
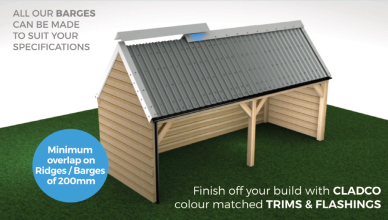
Once you have installed the final Sheet you can use Cladco Flashings for the sides and apex. Barges are used on the edges to help seal the building and provide an aesthetically pleasing effect. Please note, when joining or laying Flashings, there needs to be a minimum overlap of 200mm on Barges. Our 22mm Stitcher Screws are advised for securing Flashings in place.

8
Ridge Flashings are used for the ridge on an apex roof, whereas for a single slope roof, you may need to use a Custom Flashing. To fit the Ridge, use Stitcher Screws through the Flashing and into the Sheets. Lay Ridge Flashings from the opposite end of the roof to the direction of the prevailing wind. Each Ridge should be overlapped by a minimum of 200mm.

9
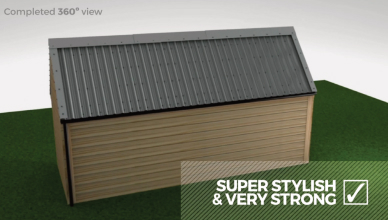
We recommend Ridge Flashings are fixed using self-drilling TEK Type Stitcher Screws through the highest point of each profile and the appropriate Ridge Filler if being used. This helps ensure a weather-resistant seal to prevent birds and vermin, as well as water, from entering the building. Ridge and Barge Flashings can be made to match your Roofing Sheets.
Commerical Buildings and two sheet runs

1
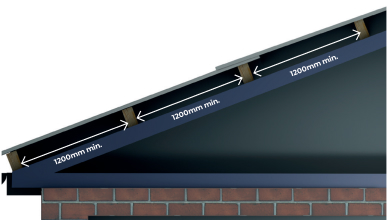
The minimum pitch needed for Box Profile Sheets is four degrees. On a two-Sheet run remember to have a purlin under the overlap, as shown. These are guides and it depends on your roof construction and pitch. If in doubt, consult an engineer. Purlin spaces using 0.7 mm thick Sheets should be approximately 1.2m apart. Purlin spaces using 0.5mm thick Sheets should be approximately 1m apart.

2
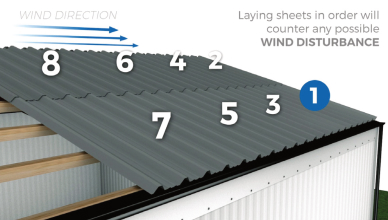
For a two-Sheet run, Sheets should be laid in a particular order to the prevailing wind. Start at the eaves and in the corner away from the direction of the prevailing wind (this will help to prevent side laps facing into the wind and water ingress). If the first Sheet is not laid perpendicular to the eaves and ridge, adjustments will have to be regularly made when laying other Sheets and a ‘saw tooth’ effect at the eaves will occur.

3
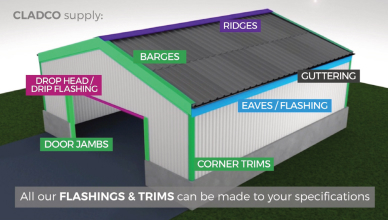
Custom Flashings can be made for projects to match the Steel Sheeting we offer. Flashings can provide weatherproofing to the building, particularly at the ridge where two Sheets meet.

4
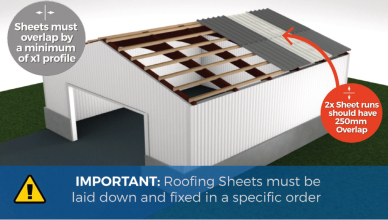
Sheets must be overlapped by a minimum of 250mm where the two Sheets meet. Roof Lights can be installed Sheets must be overlapped by a minimum of 250mm where the two Sheets meet. Roof Lights can be installed between the Sheets but must have Sheets on either side for support. Sheets should overlap side by side by at least one profile.

5
Sheets should be overlapped by the next Sheet in the run by at least one profile (‘side laps’). Adjacent runs of Sheets should overlap each other by at least 250mm (‘end laps’). Please note, that we can only supply a maximum of nine metres. If you require a longer length, it’s recommended to do a two-Sheet run.

TOP TIP
Clean the roof of any debris whilst fixing the sheets down. This will prevent it from burning through the coating on the sheet

6
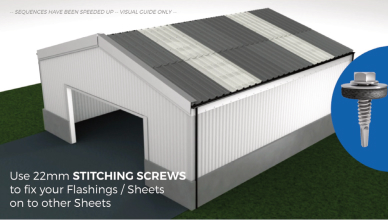
Barge Flashings can be used to seal and finish off the ends of your roofing project. Flashings can ensure the building is watertight and prevent birds and water from entering the building. It is good practice to use Mastic Lapping Tape and Stitcher Screws to ensure a robust weather-resistant join on side laps.

7
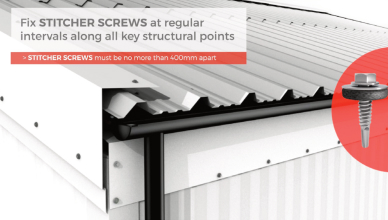
Stitcher Screws are recommended to secure Flashings. Screws should be no more than 400mm apart when securing the Flashing. Cladco Colour Caps can be used to conceal the top of each Screw.

8
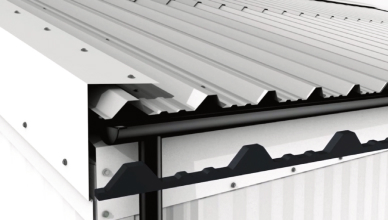
Fillers can help ensure a robust weather-resistant seal to prevent birds and vermin, as well as water, from entering the building. Cladco Eaves Foam Fillers are designed to go under a Sheet, while an opposite Ridge Foam Filler is designed to go over a Sheet. All Foam Fillers should be bonded to the Sheeting with a flexible, waterproof silicone sealant and should be continuous over the entire width of the Sheeting.

9
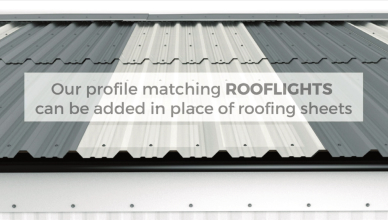
Roof Lights can be added to a project to increase the natural light coming into a building. Roof Lights have a translucent rate of 80% and can be used between Roofing Sheets. Please note, Roof Lights must be supported either with steel Sheets and appropriate purlin supports.

10
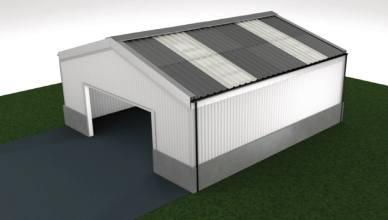
Finish your project by installing the Ridge Flashing along the centre where two Sheets meet. You can then install guttering, or fascia, as required.
FAQs
How many sheets do i need?
When it comes to planning a Box Profile roofing project, our handy Roofing Sheet Calculator will guide you through how many Sheets to order, as well as what potential Flashings and Accessories you may need, and will provide the total cost of your upcoming project.
How much do you overlap Box Profile Sheets?
Sheets should be overlapped by a minimum of 1 profile per sheet.
What is the width of your Box Profile Sheets?
Both the 32/1000 and the 34/1000 Box Profile Sheets are 1000mm in width when lapped.
What coating is best for my Box Profile project?
Typically, Polyester Paint and PVC Plastisol coatings are popular choices. Polyester coatings offer good durability and cost-effectiveness, while PVC Plastisol provides enhanced durability and resistance to weathering. Assessing factors like weather exposure, aesthetic preferences, and budget will help determine the ideal coating for your project.
Which thickness of Box Profile is best for my project?
The suitable thickness of our Box Profile Roofing Sheets for your project depends on factors like structural and durability requirements. Thicker sheets offer increased strength and durability, ideal for demanding environments or larger structures. For standard residential or commercial applications, 0.5mm to 0.7mm thickness often suffices. Assessing your specific project's load-bearing needs and environmental conditions will help determine the most suitable thickness for optimal performance.


